Types of American Windows and Doors

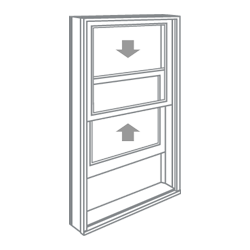
Double-Hung Window
A double-hung window has two vertically sliding sash (glass panels) in a single frame. Double-hung windows lift open while remaining flush with the wall, making them ideal around patios, decks and walkways. Both top and bottom sash tilt in for easy cleaning.
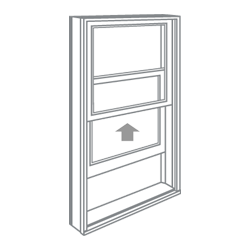
  Single-Hung Window
This style is the same as a double-hung window in appearance, but only the bottom sash opens for ventilation.
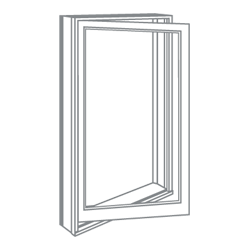
  Casement Window
Casement windows are hinged windows that open outward to the right or to the left. They’re common above kitchen sinks and give you the flexibility to group them in stunning combinations.
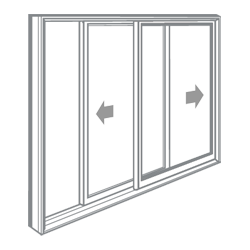
  Gliding Window

These windows feature two or three sash, with at least one of the sash sliding past the others. They provide the advantages of double-hung windows with a more contemporary look.

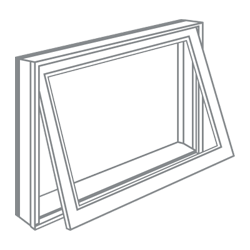
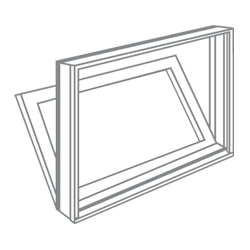
  Awning Window
Awning windows are hinged at the top and open outward. They catch breezes from the left or right and are often used above, below or alongside stationary windows.
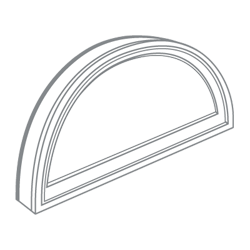
  Specialty Window
Specialty windows are stationary (nonopening) windows characterized by their special shapes, including curves and dramatic angles. They can make a signature statement in your home or provide a delicate lighting accent.
  Hopper Window
Hopper windows open inward from the top.  They’re an ideal choice for basements, garages and attics.  Hoppers are great for areas with limited space that need ventilation.
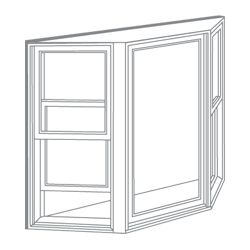
  Bay or Bow Window
Bay and bow windows are window combinations that project outward from a home.  These dramatic combinations can add space, volume and light to a room and add more personality to any home.
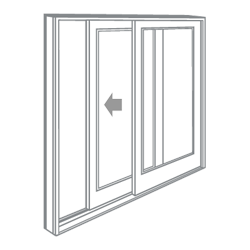
  Gliding Patio Door
Gliding patio doors have at least one door panel that glides smoothly past another panel. When space is at a premium, gliding patio doors offer a convenient way to access your patio without having to worry about interior furniture placement or possible exterior obstacles.

Effect of Aging on Formability of Aluminum Alloys

Formability or workability is generally defined as the amount of deformation that can be given to a specimen without fracture or necking in a given process. Workability is not an intrinsic material property; it depends on design variables:

  • process variables – stress, strain, strain rate, temperature, lubrication, etc., and
  • material variables – size, shape, and amount of second-phase particles, grain size, etc.

Therefore, for a given shape, workability is a function of material and process variables and can be expressed as

Workability = ƒ1 (material) -ƒ2 (process)
where ƒ1 is a measure of the ductility of the material under processing conditions, represented by forming limit criteria developed for various processes. Forming limit criteria based on limiting strains are of practical applicability because strains, as opposed to stresses, are easy to visualize and analyze in workability studies. The ƒ2 function, on the other hand, is given by stress, strain, strain-rate, and temperature histories at the potential failure sites of the work piece.

A complete workability analysis involves:

  • establishment of forming limit criteria (ƒ1) as a function of strain rate and temperature;
  • determination of stress, strain, strain-rate, and temperature histories (ƒ2) at potential failure sites; and
  • comparison of the results of flow analysis (ƒ2) with the forming limit criteria (ƒ1).

This comparison reveals the margin of safety for the deformation processing of a defect-free product. When a negative margin exists, it assists in deciding on the necessary changes in material or process variables, or both.

Free surfaces are the most commonly observed fracture sites in bulk deformation processes. In most cases, free-surface fractures determine the limits of deformation that can be imparted to the deforming material. Such fractures occur at the free surfaces of the specimen during processing, for example, edge cracking in rolling, surface cracking in bending, heading, open-die forging, or surface cracking before contact is achieved between the preform and the die walls in an impression-die forging.

There is developed a fracture criterion, based on limiting strains-to-fracture, for the prediction and prevention of surface cracks in bulk deformation processes. Local strains calculated from measurements, at fracture, of grid markings on the free surfaces of cylinders upset under different friction conditions and with different height-to-diameter ratios, are plotted. Fracture strains obtained from bend tests, measured by grid markings on convex surfaces of bend specimens, fall onto the extension of the fracture line determined by compression tests. Thus, bend tests are complimentary to compression tests, and are particularly useful when compression testing is not feasible.

The material function ƒ1, has not been studied systematically. Recently, has examined the effect of size, shape, and volume fraction of second-phase particles on the bulk formability of American Iron and Steel Institute (AISI) 1040, 1060, and 1090 carbon steels. The present study evaluates the workability of three heat-treatable aluminum alloys as influenced by aging and accompanying structural changes.

Three heat-treatable aluminum alloys (2014, 2024, and 7075) were received in the form of 12.7 mm diameter rods. The 2014 (≈100HB) and 2024 (≈130HB) aluminum alloys were in T4 condition. The 7075 alloy was received in T6 condition (≈150 HB).

Chemical compositions of aluminum alloys:

  • Aluminum alloy 2014: Cu-4.7%; Mg-0.5%; Mn-0.7%; Si-0.6%; Fe-0.3%
  • Aluminum alloy 2024: Cu-4.3%; Mg-1.5%; Mn-0.7%; Si-0.2%; Fe-0.3%
  • Aluminum alloy 7075: Cu-1.6%; Mg-2.5%; Mn-0.2%; Si-0.2%; Fe-0.3%; Zn-5.6%

The degree of banding in the 2014 aluminum alloy was more severe, and the elongated grains were larger near the surface. These large grains at the surface layers caused surface wrinkling during upset testing of the alloy, necessitating machining off a layer of 0.7 mm thickness from the surface in order to bring the wrinkling to an acceptable level. In the 2024 and 7075 aluminum alloys, surface wrinkling was minimal; the original surfaces were preserved during testing.

In order to study the effect of aging on workability, the alloys were solution treated (470-500°C) and aged to four different levels: naturally aged, peak-aged, over-aged, and highly over-aged. Solution treatments were carried out in a tube furnace in argon for the 2014 alloy, and in nitrogen for the 2024 and 7075 alloys. This was followed by quenching in an ice-water mixture.

Tests for the naturally aged condition were carried out after aging the specimens at room temperature (25°C) for one week. An oil bath was used for artificial aging. No recrystallization was detected after solution or aging treatments.

The 2024 aluminum alloy shows greater workability than the 2014 and 7075 alloys in all conditions. While the workability index in the 7075 alloy is improved ≈50 percent by over-aging, improvement in workability levels in the 2000 series is more pronounced. In these alloys, the workability index in the highly over-aged condition is approximately three times that of the naturally aged condition.

Upset test specimens of the 7075 alloy revealed exclusively 45-deg cracks in all conditions. The 2014 aluminum alloy specimens also showed 45-deg cracks, except in the highly overaged condition, where cracks in ≈20 percent of the specimens were vertical (also known as normal). These vertical cracks were randomly located on the fracture line.

In the 2024 alloy, both vertical and 45-deg cracks were observed in all conditions; in general, specimens with low aspect ratios tested under high friction conditions gave vertical cracks. The percentage of specimens containing vertical cracks increased with increased aging time. In the naturally aged condition, only ≈15 percent of the specimens had vertical cracks. This type of crack was seen in ≈20 percent in peak-hardness specimens and ≈50 percent of those in the over-aged conditions. In the highly over-aged condition, though, ≈90 percent of the specimens exhibited vertical cracks. It is clear that 45-deg cracking is the predominant fracture mode at low workability levels in this alloy.

The 45-deg cracks did not penetrate the cross-section of the specimens in the 2000 series alloys. Cracks in the 7075 alloy, however, generally traversed the cross-section of the specimen; there was no indication that cracking started in the center of the specimens.

In the three alloys, the poorest bulk workability was obtained in the naturally aged and peak-aged conditions, where the precipitated particles were small and sharable. Localization of shear in these conditions in heat-treatable aluminum alloys is well documented. Localization of shear and accompanying voiding in the 7000 series aluminum alloys has been studied and co-workers and Leroy and Embury.

Chung and co-workers observed the occurrence of localized shear failure in 7075-T4 aluminum alloy before the onset of necking and concluded that either deformation softening or negative strain-rate sensitivity was necessary for localization to occur. The degree of localization in overaged conditions, however, should be lower than that in the naturally aged condition, as evidenced by the small improvement in the workability level.

Results of tension and compression tests on 2014 alloy indicate that lack of shear localization in tension is not a guarantee that this phenomenon will be prevented in compression. In the compression of overaged specimens of this alloy, only 45-deg cracks are observed, and the persistence of localized shear failure is probable. It appears that the 2024 alloy is least affected by shear localization among the three alloys, as evidenced by the high degree of workability and occurrence of vertical cracks in all conditions.

Annealing of Aluminum and Aluminum Alloys

Work hardening is used extensively to produce strain-hardened tempers of the non-heat-treatable alloys. The severely cold worked or full-hard condition (H18 temper) is usually obtained with cold work equal to about 75% reduction in area. The H19 temper identifies products with substantially higher strengths and greater reductions in area. The H16, H14, and H12 tempers are obtained with lesser amounts of cold working, and they represent three-quarter-hard, half-hard, and quarter-hard conditions, respectively.

A combination of strain hardening and partial annealing is used to produce the H28, H26, H24, and H22 series of tempers; the products are strain hardened more than is required to achieve the desired properties and then are reduced in strength by partial annealing.

A series of strain-hardened and stabilized tempers – H38, H36, H34, and H32 – are employed for aluminum-magnesium alloys. In the strain-hardened condition, these alloys tend to age soften at room temperature. Therefore, they are usually heated at a low temperature to complete the age-softening process and to provide stable mechanical properties and improved working characteristics.

Products hardened by cold working can be restored to the O temper, a soft, ductile condition, by annealing. Annealing eliminates strain hardening, as well as the changes in structure that are the result of cold working.

The distorted, dislocated structure resulting from cold working of aluminum is less stable than the strain-free, annealed state, to which it tends to revert. In zone-refined aluminum, this reversion may take place at room temperature. Lower-purity aluminum and commercial aluminum alloys undergo these structural changes only with annealing at elevated temperatures. Accompanying the structural reversion are changes in the various properties affected by cold working. These changes occur in several stages, according to temperature or time, and have led to the concept of different annealing mechanisms or processes. The first of these, occurring at the lowest temperatures and shortest times of annealing, is known as the recovery process.

Recovery

Structural changes occurring during the recovery of polygonization and subgrain formation has been obtained by x-ray diffraction and confirmed with the electron microscope. The electron micrographs may show the change in structure that accompanies advanced recovery. The reduction in the number of dislocations is greatest at the center of the grain fragments, producing a subgrain structure with networks or groups of dislocations at the subgrain boundaries. With increasing time and temperature of heating, polygonization becomes more nearly perfect and the subgrain size gradually increases. In this stage, many of the subgrains appear to have boundaries that are free of dislocation tangles and concentrations.

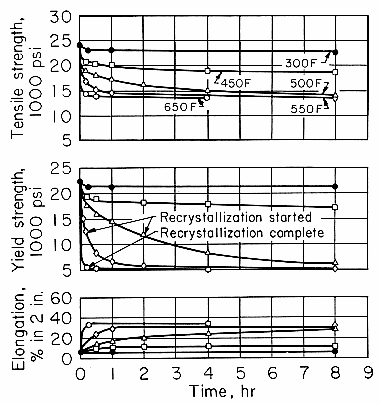
The decrease in dislocation density caused by recovery-type annealing produces a decrease in strength and other property changes. The effects on the tensile properties of 1100 alloy are shown in Fig. 1. At temperatures through 450°F (230°C), softening is by a recovery mechanism. It is characterized by an initial rapid decrease in strength and a slow, asymptotic approach to a strength that is lower, the higher the temperature.

fig1391
Fig. 1. Isothermal annealing curves for 1100-H18 sheet.
Recovery annealing is also accompanied by changes in other properties of cold worked aluminum. Generally, some property change can be detected at temperatures as low as 200 to 250°F (90°C to 120°C); the change increases in magnitude with increasing temperature. Complete recovery from the effects of cold working is obtained only with recrystallization.

Recrystallization

Recrystallization is characterized by the gradual formation and appearance of a microscopically resolvable grain structure. The new structure is largely strain-free. There are few if any dislocations within the grains and no concentrations at the grain boundaries. Recrystallization occurs with longer times or higher heating temperatures than do the recovery effects described in the preceding section, although some overlapping of the two processes is usual.

Recrystallization depends upon time and temperature. This relationship can be expressed by a rate equation of the type:

1/t = ke-a/T

where t is time, T is the absolute temperature, e is the base of natural logarithms, and k and a are constants.

The constant a is frequently replaced by Q/R, where R is the gas constant and Q is an energy term, similar to an activation energy. Aluminum alloys generally show good agreement with this time-temperature relationship except when secondary reactions interfere, such as the solution or precipitation of intermetallic phases at annealing temperatures.

Composition also influences the recrystallization process. This is particularly true when various elements are added to extreme purity aluminum; almost any added impurity or alloying element will raise the recrystallization temperature substantially. For commercial-purity aluminum and commercial alloys, however, normal variations in composition have little effect on recrystallization behavior. Extensively cold worked commercial alloys usually can be recrystallized by heating for several hours at 650 to 775°F (340 to 410°C).

Grain size is also strongly affected by composition. Generally, common alloying elements and impurities such as Cu, Fe, Mg, and Mn decrease grain size. The effects of elements of limited solubility, such as Cr, Fe, and Mn, are influenced by the compounds they form with each other and with other elements, and by their distribution in the structure.

The recovery process is not accompanied by any significant change in preferred orientation or texture of the deformed metal. However, the new grains formed by recrystallization frequently develop in orientations that differ from the principal components of the deformation texture. This re-orientation has been extensively studied in rolled sheet and varies considerably with the past history and the composition of the alloy.

Recrystallization produces further changes in the properties of the deformed and recovered metal. These continue until annealing and recrystallization are complete. The properties then are those of the original, unstrained metal, except as they are changed by differences in grain size and preferred orientation. In heat treatable alloys, annealing also may be accompanied by precipitation and changes in solute concentration.

Recrystallization is also accompanied by a further decrease in stored energy, as measured calorimetrically, as well as by complete elimination of residual stresses.

Grain Growth After Recrystallization

Heating after recrystallization may produce grain coarsening. This can take one of several forms. The grain size may increase by a gradual and uniform coarsening of the microstructure. This is usually identified as “normal” grain growth.

It proceeds by the gradual elimination of small grains with unfavorable shapes or orientations relative to their immediate neighbors. This occurs readily in high-purity aluminum and its solid solution alloys, and can lead to relatively large, average grain sizes. Such grain growth is promoted by small recrystallized grains, high temperatures, and extensive heating. Some grain coarsening of this type also occurs in commercial aluminum alloys, but it is greatly restricted by finely divided impurity phases and by intermetallic compounds of elements, such as manganese and chromium that slows down the process pin the grain boundaries, and prevent further movement. Generally, these grains grow only at very high temperatures and may attain diameters of several inches.

Apparently, the normal growth-inhibiting effects of elements such as iron, manganese, and chromium are lost or modified at high temperatures, through solution or through changes in particle size and shape. Because of the high temperatures, the few grains that first lose or overcome these restraints grow rapidly and consume other potential growth centers, and in this manner, a few grains of very large size are formed.

In most alloys, high temperatures alone are not the only cause for “giant grains”: A small primary grain size and well-developed annealing texture are other factors that promote this form of grain growth.

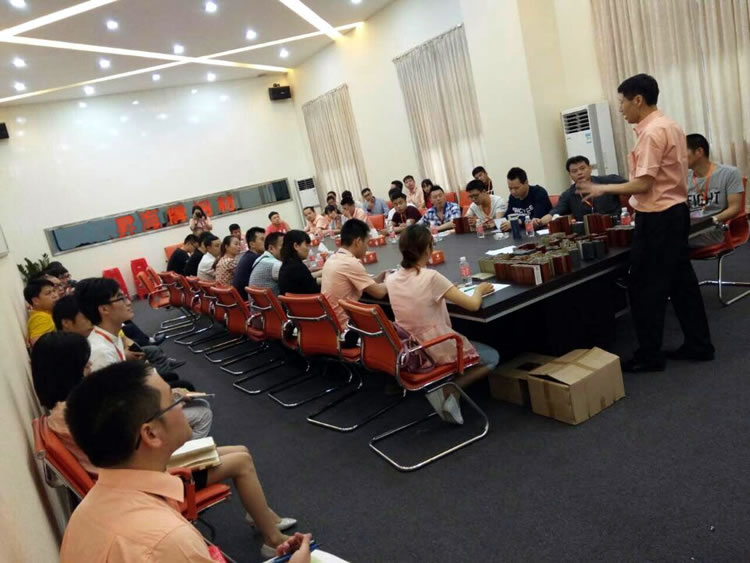
Training about the aluminium profiles for sliding/casement window/door

training

Training about the aluminium profiles for sliding window/door & casement window/door. How could we make the sliding or casement window & door perfect ? Not only depends on the surface&design. every measure of the detailed place is every important. So we not only just sell aluminium profiles & window/door. also provide professional advice for the projects.From the aluminium profiles to hardware &many other details. Different cases could help to understand clearly. Customers here at site, even they are not window&door maker, they just aluminium profiles distributor, could understand well and shown a good performance during todays’ training!

Formability Testing of Aluminum Sheet Materials

A larger number of tests have been used in an effort to measure or predict the formability of sheet materials. Many of these have been criticized because of cost, complexity, difficulty in the analysis of data, lack of correlation between laboratory results and field forming performance, etc. Some of these problems may be overcome when test procedures have been standardized and a better understanding of the mechanics of the tests is achieved.

There will always be a need for formability tests. The effect of composition and processing modifications on formability must be determined during alloy development, preferably without resorting to expensive field forming trials in the initial stages.

Tests are often needed in the analysis of field forming problems requiring the comparison of problem lots to a data base. Tests are also needed for quality assurance, especially since it appears that many sheet users are working toward the use of test results as acceptance criteria.

Part of the lack of correlation between laboratory test results and field forming performance is due to a misuse of the test results. This lack of correlation leads to a lack of faith in the test procedures. If such a correlation is to be expected, the strain state of the test must match the strain state in which the failure occurred in the field. One should not expect the results of a drawability test to correlate with field failures which occurred in plane strain tension. This is because micro structural features respond differently to different states of stress, which has been demonstrated for both precipitation and dispersion strengthened aluminum sheet alloys.

Numerous questions arise when formability tests are considered as quality assurance tools or when correlations between laboratory and field results are sought. Tool geometry, lubrication, sample thickness and test procedure have all been shown to influence test results. All of these factors contribute to the between-lab variability, which has been shown to be large, and make data analysis difficult.

All sheet metal forming operations are combinations of stretching, bending and drawing. The formability tests available under each of these categories, which is a two-way flowchart to aid in the solution of metal forming problems or to aid in the screening of materials where forming is critical. When is used as a screening aid during alloy development, tests characterizing performance in all three modes may be necessary.

When a field forming problem is encountered, grid strain analysis (GSA) and the limiting strain curve are used to determine the strain state at failure and to decide if the problem is material or tooling related.

Stretching can be subdivided into uniaxial, biaxial and plane strain modes. There is some question as to whether a microstructure yielding good formability in one of these stretching categories will give good formability in the other categories.

Uniaxial tension

The uniaxial tension test is the only commonly used test for the uniaxial stretching mode. The most commonly used parameters calculated from tension test results are: the yield strength, the ultimate tensile strength, the percent total elongation in a standard gauge length (usually 50.8 mm), the percent uniform elongation and the percent reduction in area. These are commonly referred to as the mechanical properties.

The elongation values depend upon the gauge length used. A more fundamental, gauge length independent measure of ductility is the reduction in area, % RA, which is given by

%RA=[1-(At/Ao)]·100%

Ao, At original and final cross-sectional areas, respectively

The measurement of the final cross-sectional area may be difficult, which has led to another approach to obtaining a fundamental ductility parameter. Elongation surveys consist of measuring the elongation over many gauge lengths and extrapolating to zero gauge length, with this extrapolated value being the fundamental value.

Other parameters can also be calculated from uniaxial tension test results. True stress-true strain data can be fit to the Hollomon equation, where true stress, σ, is given in terms of true strain, ε, the strain hardening exponent, n, and the flow strength, K, by

σ=Kεn

For steel, the strain hardening exponent correlates well with stretch formability. However, for aluminum alloys, the strain hardening exponent alone does not adequately predict formability.

The plastic strain ratio (or normal anisotropy value), r, is often calculated from uniaxial tension test results, and is given by

r=εwt

εw, εt et true width and thickness strains, respectively.

The plastic strain ratio may be calculated at fracture, at a constant strain or plots of r versus longitudinal strain may be made by continuously measuring εw and εt.

The prediction of “formability” in modes other than uniaxial stretching from parameters calculated from uniaxial tension test results, often referred to as “forming indices”, has often been attempted by many persons in the sheet metal forming industry.

Because parameters such as total elongation, uniform elongation, plastic strain ratio, strain hardening exponent, etc., depend upon microstructure, they cannot be varied independently. It is difficult to assign quantitative values to the relative influence each of these will have on formability, although their qualitative effects are easily rationalized. Regression models can be used to predict formability in terms of these parameters, but these models are specific to given forming operations.

In summary, the uniaxial tension test should not be considered a formability test. Although the results will correlate with field failures in the uniaxial stretching mode, few forming operations result in failures which occur in the uniaxial stretching mode. The test should be used to characterize the mechanical properties of the material and to check for proper temper.

Biaxial tension

The hydraulic bulge test yields stress-strain data in the balanced biaxial stretching mode. The advantage of the hydraulic bulge test is that the strain hardening ability of a material at strains approaching those experienced in actual forming operations can be evaluated.

Strain rate sensitivity is a very important aspect of material behavior. When gradients in strain exist, materials which harden with increasing strain rate will distribute deformation more uniformly because additional deformation in areas of high strain rate, such as neck, will require greater stress. Ductility generally increases with increasing strain rate sensitivity and small changes in rate sensitivity may result in significant changes in the distribution of strain.

Strain rate sensitivity has also been measured using the hydraulic bulge test. Two methods have been used to evaluate strain rate sensitivity. The first involves several abrupt changes in strain rate during a single test. The second requires that two tests be performed at different constant strain rates. The results of the two methods have been shown to be comparable.

In summary, the hydraulic bulge test yields information about the strain hardening and strain rate sensitivity characteristics of the material. In addition, the true strain at fracture is measured. This information is not complicated by the effects of friction.

Plane strain tension

Plane strain tension tests, following the work of Wagoner are in the development stage. Currently, the elongation at fracture in the plane strain state can be evaluated for uniaxially loaded samples. This elongation value can be used in conjunction with those from the uniaxial and biaxial tension tests to plot an approximate limiting strain curve.

A method for obtaining a stress-strain relationship in the plane strain state should be sought. This will allow the strain hardening behavior of aluminum alloys to be studied in uniaxial, biaxial and plane strain tension.

It is unclear as to whether the effect of microstructure on strain hardening will be identical in all three stretching modes. It has been shown for some aluminum alloys that factors reducing the strain hardening capacity in the uniaxial and biaxial modes also reduce strain hardening capacity in plane strain. It may be determined that information obtained from the hydraulic bulge test will adequately predict formability in all three stretching modes.

Attempts should be made to correlate plane strain tension test results with simulative formability test results and field forming test results. Until such work is completed and a method for obtaining a plane strain stress-strain curve is developed, the test should not be considered a formability test and should not be widely used.

Limiting dome height

The limiting dome height (LDH) test has been proposed as a laboratory formability test showing good correlation with press formability. Rectangular blanks of various widths are rigidly clamped in the longer direction and stretched by a hemispherical punch. Transverse constraint, varied by blank width and lubrication, controls the amount of material drawing-in. The height of the dome at peak load, which reflects the combined effects of strain hardening characteristics and limiting strain capability of the material, is used as a measure of stretch-formability.

The effect of friction on the dome height must be held constant in order to evaluate the relative stretchability of alloys. In the past, samples have been solvent cleaned and tested dry in an attempt to hold friction constant at a high value. The test should be continued to be performed dry for the plane strain condition, which is of greatest interest, until that method has been developed.

Aluminum Casting Processes

Aluminum is one of the few metals that can be cast by all of the processes used in casting metals. These processes, in decreasing order of amount of aluminum casting, are: die casting, permanent mold casting, sand casting (green sand and dry sand), plaster casting, investment casting, and continuous casting. Other processes such as lost foam, squeeze casting, and hot isostatic pressing are also mentioned.

There are many factors that affect selection of a casting process for producing a specific aluminum alloy part. The most important factors for all casting processes are:

  • Feasibility and cost factors
  • Quality factors.

In terms of feasibility, many aluminum alloy castings can be produced by any of the available methods. For a considerable number of castings, however, dimensions or design features automatically determine the best casting method. Because metal molds weigh from 10 to 100 times as much as the castings they are used in producing, most very large cast products are made as sand castings rather than as die or permanent mold castings. Small castings usually are made with metal molds to ensure dimensional accuracy.

Quality factors are also important in the selection of a casting process. When applied to castings, the term quality refers to both degree of soundness (freedom from porosity, cracking, and surface imperfections) and levels of mechanical properties (strength and ductility).

However, it should be kept in mind that in die casting, although cooling rates are very high, air tends to be trapped in the casting, which gives rise to appreciable amounts of porosity at the center. Extensive research has been conducted to find ways of reducing such porosity; however, it is difficult if not impossible to eliminate completely, and die castings often are lower in strength than low-pressure or gravity-fed permanent mold castings, which are more sound in spite of slower cooling.

Die Casting

Alloys of aluminum are used in die casting more extensively than alloys of any other base metal. In the United States alone, about 2.5 billion dollars worth of aluminum alloy die castings is produced each year. The die casting process consumes almost twice as much tonnage of aluminum alloys as all other casting processes combined.

Die casting is especially suited to production of large quantities of relatively small parts. Aluminum die castings weighing up to about 5 kg are common, but castings weighing as much as 50 kg are produced when the high tooling and casting-machine costs are justified.

Typical applications of die cast aluminum alloys include:

  • Alloy 380.0 – Lawnmower housings, gear
  • Alloy A380.0 – Streetlamps housings, typewriter frames, dental equipment
  • Alloy 360.0 – Frying skillets, cover plates, instrument cases, parts requiring corrosion resistance.
  • Alloy 413.0 – Outboard motor parts such as pistons, connecting rods, and housings
  • Alloy 518.1 – Escalator parts, conveyor components, aircraft and marine hardware and lit tings.

With die casting, it is possible to maintain close tolerances and produce good surface finishes. Die castings are best designed with uniform wall thickness: minimum practical wall thickness for aluminum alloy die castings is dependent on casting size.

Die castings are made by injection of molten metal into metal molds under substantial pressure. Rapid injection and rapid solidification under high pressure combine to produce a dense, fine-grain surface structure, which results in excellent wear and fatigue properties. Air entrapment and shrinkage, however, may result in porosity, and machine cuts should be limited to 1.0 mm to avoid exposing it.

Aluminum alloy die castings usually are not heat treated but occasionally are given dimensional and metallurgical stabilization treatments.

Die castings are not easily welded or heat treated because of entrapped gases. Special techniques and care in production are required for pressure-tight parts. The selection of an alloy with a narrow freezing range also is helpful. The use of vacuum for cavity venting is practiced in some die casting foundries for production of parts for some special applications.

Approximately 85% of aluminum alloy die castings are produced in aluminum-silicon-copper alloys (alloy 380.0 and its several modifications). This family of alloys provides a good combination of cost, strength, and corrosion resistance, together with the high fluidity and freedom from hot shortness that are required for ease of casting. Where better corrosion resistance is required, alloys lower in copper, such as 360.0 and 413.0 must be used.

Alloy 518.0 is occasionally specified when highest corrosion resistance is required. This alloy, however, has low fluidity and some tendency to hot shortness. It is difficult to cast, which is reflected in higher cost per casting.

Permanent mold casting

Permanent mold (gravity die) casting, like die casting, is suited to high-volume production. Permanent mold castings typically are larger than die castings. Maximum weight of permanent mold castings usually is about 10 kg, but much larger castings sometimes are made when costs of tooling and casting equipment are justified by the quality required for the casting.

Permanent mold castings are gravity-fed and pouring rate is relatively low, but the metal mold produces rapid solidification. Permanent mold castings exhibit excellent mechanical properties. Castings are generally sound, provided that the alloys used exhibit good fluidity and resistance to hot tearing.

Mechanical properties of permanent mold castings can be further improved by heat treatment. If maximum properties are required, the heat treatment consists of a solution treatment at high temperature followed by a quench and then natural or artificial aging. For small castings in which the cooling rate in the mold is very rapid or for less critical parts, the solution treatment and quench may be eliminated and the fast cooling in the mold relied on to retain in solution the compounds that will produce age hardening.

Some common aluminum permanent mold casting alloys, and typical products cast from them, are presented below.

  • Alloy 366.0 – Automotive pistons
  • Alloys 355.0, C355.0, A357.0 – Timing gears, impellers, compressors, and aircraft and missile components requiring high strength
  • Alloys 356.0, A356.0 – Machine tool parts, aircraft wheels, pump parts, marine hardware, valve bodies
  • Other aluminum alloys commonly used for permanent mold castings include 296.0, 319.0, and 333.0.

Sand casting

Sand casting, which in a general sense involves the forming of a casting mold with sand, includes conventional sand casting and evaporative pattern (lost-foam) casting.

In conventional sand casting, the mold is formed around a pattern by ramming sand, mixed with the proper bonding agent, onto the pattern. Then the pattern is removed, leaving a cavity in the shape of the casting to be made. If the casting is to have internal cavities or undercuts, sand cores are used to make them. Molten metal is poured into the mold, and after it has solidified the mold is broken to remove the casting. In making molds and cores, various agents can be used for bonding the sand. The agent most often used is a mixture of clay and water.

Casting quality is determined to a large extent by foundry technique. Proper metal-handling practice is necessary for obtaining sound castings. Complex castings with varying wall thickness will be sound only if proper techniques are used.

Evaporative (lost-foam) pattern casting

Evaporative pattern casting (EPC) is a sand casting process that uses an unbounded sand mold with an expendable polystyrene pattern placed inside of the mold. This process is somewhat similar to investment casting in that an expendable material can be used to form relatively intricate patterns in a surrounding mold material. Unlike investment casting, however, evaporative pattern casting (EPC) involves a polystyrene foam pattern that vaporizes during the pouring of molten metal into a surrounding mold of unbounded sand.

Shell Mold Casting

In shell mold casting, the molten metal is poured into a shell of resin-bonded sand only 10 to 20 mm thick – much thinner than the massive molds commonly used in sand foundries. Shell mold castings surpass ordinary sand castings in surface finish and dimensional accuracy and cool at slightly higher rates; however, equipment and production are more expensive.

Plaster Casting

In this method, either a permeable (aerated) or impermeable plaster is used for the mold. The plaster in slurry form is poured around a pattern, the pattern is removed and the plaster mold is baked before the casting is poured. The high insulating value of the plaster allows castings with thin wads to be poured.

Minimum wall thickness of aluminum plaster castings typically is 1.5 mm. Plaster molds have high reproducibility, permitting castings to be made with fine details and close tolerances. Mechanical properties and casting quality depend on alloy composition and foundry technique. Slow cooling due to the highly insulating nature of plaster molds tends to magnify solidification-related problems, and thus solidification must be controlled carefully to obtain good mechanical properties.

Cost of basic equipment for plaster casting is low; however, because plaster molding is slower than sand molding, cost of operation is high. Aluminum alloys commonly used for plaster casting are 295.0, 355.0, C355.0, 356.0 and A356.0.

Investment casting

Investment casting of aluminum most commonly employs plaster molds and expendable patterns of wax or other fusible materials. Plaster slurry is “invested” around patterns for several castings, and the patterns are melted out as the plaster is baked.

Investment casting produces precision parts; aluminum castings can have walls as thin as 0.40 to 0.75 mm. However, investment molding is often used to produce large quantities of intricately shaped parts requiring no further machining so internal porosity seldom is a problem. Because of porosity and slow solidification, mechanical properties are low.

Investment castings usually are small, and it is especially suited to production of jewelry and parts for precision instruments. Recent strong interest by the aerospace industry in the investment casting process has resulted in limited use of improved technology to produce premium quality castings. Combining this accurate dimensional control with the high and carefully controlled mechanical properties can, at times, justify casting costs and prices normally not considered practical.

Aluminum alloys commonly used for investment castings are 208.0, 295.0, 308.0, 355.0, 356.0, 443,0, 514.0, 535.0 and 712.0.

Centrifugal Casting

Centrifuging is another method of forcing metal into a mold. Steel baked sand, plaster, cast iron, or graphite molds and cores are used for centrifugal casting of aluminum. Metal dies or molds provide rapid chilling, resulting in a level of soundness and mechanical properties comparable or superior to that of gravity-poured permanent mold castings.

Wheels, wheel hubs, and papermaking or printing rolls are examples of aluminum parts produced by centrifugal casting. Aluminum alloys suitable for permanent mold, sand, or plaster casting can be cast centrifugally.

Continuous Casting

Long shapes of simple cross section (such as round, square, and hexagonal rods) can be produced by continuous casting, which is done in a short, bottomless, water-cooled metal mold.

The casting is continuously withdrawn from the bottom of the mold; because the mold is water cooled, cooling rate is very high. As a result of continuous feeding, castings generally are free of porosity. In most instances, however, the same product can be made by extrusion at approximately the same cost and with better properties, and thus use of continuous casting is limited. The largest application of continuous casting is production of ingot for rolling, extrusion, or forging.

Composite-Mold Casting

Many of the molding methods described above can be combined to obtain greater flexibility in casting. Thus, dry sand cores often are used in green sand molds, and metal chills can be used in sand molds to accelerate local cooling.

Hot isostatic pressing

Hot isostatic pressing of aluminum castings reduces porosity and can thus decrease the scatter in mechanical properties. The method also makes possible the salvaging of castings that have been scrapped for reasons of internal porosity, thereby achieving improved foundry recovery. This advantage is of more significant importance in the manufacture of castings subject to radiographic inspection when required levels of soundness are not achieved in the casting process. The development of hot isostatic pressing is pertinent to the broad range of premium castings, but is especially relevant for the more difficult-to-cast aluminum-copper series.

Hybrid Permanent Mold Processes

Although die casting, centrifugal casting, and gravity die casting constitute, on a volume basis, the major permanent mold processes, there are also some hybrid processes that use permanent molds. This includes squeeze casting and semisolid metal processing.

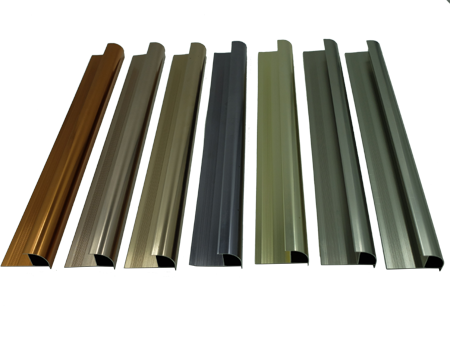
Kitchen and Curtain Rail Profiles

Aluminum Profile for Kitchen Cabinet and Curtain Rail

An array of kitchen and curtain rails are available to complement your curtains.  Our kitchen and rail profiles are available in a variety of sizes and widths and with finials that that are assured to add to the atmosphere of your rooms.  We believe that in providing new and sturdy designs to meet our customers.

Visit http://www.shenghai-alu.com/

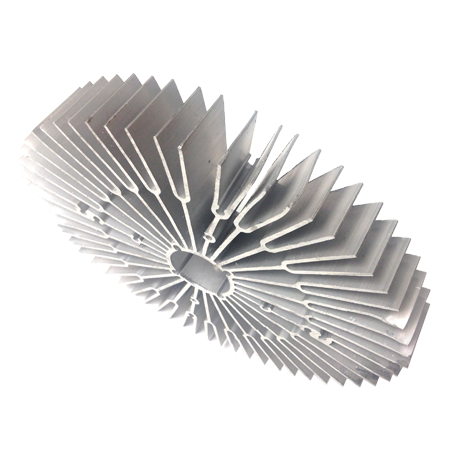
Heat Sink Profiles

Aluminum Heat Sink

There are a wide variety of heat sinks profiles that are standardized and can be customized to meet the needs of our customers. The heat sinks are tested for long term performance and ensured to operate with efficiency. The company develops customized products based on the area of application of the heat sink, and hence is able to deliver high quality and low costs.

Visit http://www.shenghai-alu.com/

Aluminum Tile Trim

Tile Trim Aluminum Profile

The state-of-the-art Aluminum Tile Trim are available at competitive pricing. These tile-trim products boast of stylish and trendy designs for all your skirting needs. They are made of high quality non-toxic material and are competitively priced. Being made of near-pure aluminum materials and developed under high quality control processes, Aluminum Tile Trim are the best solutions for a perfect room design.

Visit http://www.shenghai-alu.com/